
Amazon DSP Frequency Capping: A Complete Guide to Frequency Caps, Settings & Reports
Descriptions
If your Amazon DSP budget is climbing while sales stay flat, the problem may not be your audience or your creative. You may simply be paying to reach the same shoppers too many times.
And those wasted impressions are getting more expensive. SellerApp’s State of Amazon Advertising 2026 found that platform-wide CPM surged 47.46% in 2025 to an average of $7.82 per thousand impressions. When reach costs nearly 50% more than it did a year ago, repeatedly serving ads to shoppers who have already tuned out can drain your budget fast.
The opportunity cost is just as important. Our benchmark research found that 36.5% of DSP-attributed purchases come from new-to-brand customers. Every impression wasted on an overexposed shopper is budget that could have gone toward reaching someone who has never bought from your brand before.
That is where Amazon DSP Frequency Capping comes in. By controlling how often shoppers see your ads, you can reduce wasted exposure, protect reach, and keep more of your budget working toward incremental growth.
This guide shows you how to set frequency caps at the order and line-item level, use Frequency Groups across overlapping campaigns, read frequency reports, and find the point where more impressions stop helping and start costing you.
Quick Gudie :
- What Is Frequency Capping in Amazon DSP?
- Frequency Cap vs. Frequency Optimization
- Why the Amazon DSP Frequency Cap Matters for Advertisers
- How Ad Frequency Impacts ROAS and Brand Perception
- How Frequency Capping in Amazon DSP Works
- How the Frequency Cap of Amazon DSP Ads Applies Across Devices
- Amazon DSP Frequency Cap Settings: How to Set Them Up
- Amazon DSP Reach and Frequency: Finding the Right Balance
- How to Generate the Frequency Report in Amazon Marketing Cloud
- How to Read the Amazon DSP Frequency Report (Step by Step)
- Managing Frequency at Scale with SellerApp’s DSP Dashboard
- Common Amazon DSP Frequency Capping Mistakes to Avoid
- Amazon DSP Frequency Capping Best Practices Checklist
- Final Takeaway: Mastering Frequency Capping in Amazon DSP
- FAQ
What Is Frequency Capping in Amazon DSP?
At its simplest, a frequency cap is a rule that limits how many times a single shopper can see your ad within a set period. For example, a cap of 3 impressions every 7 days means one shopper can see your ad no more than three times in a week. Once they hit that limit, Amazon DSP stops serving them the ad until the seven-day window resets.
Understanding Amazon DSP Ad Frequency
Frequency is the average number of times each shopper saw your ad. Say your campaign delivered 100,000 impressions across 20,000 unique shoppers. Those 100,000 impressions were not shown to 100,000 different people. They were repeat ad views across the same group of 20,000 shoppers.
Divide 100,000 total impressions by 20,000 unique shoppers, and you get an average frequency of five. In other words, each shopper saw your ad five times on average.
That single number tells you a lot about whether you are building awareness or just repeating yourself to the same faces.
The reason ad frequency matters so much is that it behaves like a dial with a sweet spot. Too low and shoppers never remember you.
Too high and you are paying to irritate people who already decided. Watching ad frequency over time is one of the first habits strong advertisers build, because it is the earliest warning sign that spend is drifting toward waste.
Reach and Frequency in Amazon DSP Explained
Reach and frequency are two sides of the same coin, and you cannot fully understand one without the other. Reach tells you how many unique shoppers saw your ad. Frequency tells you how many times, on average, each shopper saw it. Amazon DSP reach and frequency together describe the shape of your audience exposure, and the balance between them decides how efficiently your budget works.
Here is the trade-off in plain terms. A fixed budget can buy you broad reach with light frequency, or narrow reach with heavy frequency. When you study Amazon DSP reach and frequency side by side, you are really asking whether you want to introduce your brand to more shoppers or reinforce your message with a smaller audience.
Frequency capping is the lever that lets you make that choice deliberately instead of leaving it to the auction. SellerApp helps you see both sides of that decision in one place, so you can track whether your campaigns are expanding unique reach or concentrating too much spend on repeat exposure. From there, you can adjust frequency based on what the campaign actually needs: more new shoppers, more repetition, or a better balance between the two.
Frequency Cap vs. Frequency Optimization
A frequency cap is a hard ceiling. You set a number, and the platform will not exceed it. Frequency optimization is softer. It leans on Amazon’s modeling to find an efficient exposure level based on conversion signals, without you dictating a strict limit.
Most experienced advertisers use both. For example, you might set a frequency cap of five impressions per shopper per week. That is the hard limit. Within those five opportunities, frequency optimization can decide whether a shopper needs two, three, or all five exposures based on their likelihood to convert.
The cap prevents runaway exposure. Optimization decides how much exposure is actually useful within that limit. One controls the maximum; the other tries to find the most efficient number below it.
Why the Amazon DSP Frequency Cap Matters for Advertisers
You could run DSP without ever touching a cap. Plenty of advertisers do, and their reports usually tell a sad story of bloated impression counts and thin returns.
You can set frequency caps directly in Amazon DSP at the order or line-item level. At the order level, open the order settings and scroll to the Optimization section. For a specific line item, open its settings and go to the Delivery section. From there, you choose the maximum number of impressions a shopper can receive and the time window for that limit.
For example, setting a cap of three impressions every seven days means a shopper can see the ad no more than three times during that period. Once they reach the limit, they are no longer eligible to receive another impression until the window resets.
The Amazon DSP frequency cap is not a nice-to-have setting buried in a menu. It is one of the few controls that directly determines whether your budget keeps chasing the same shoppers or reaches people who still have a chance of converting.
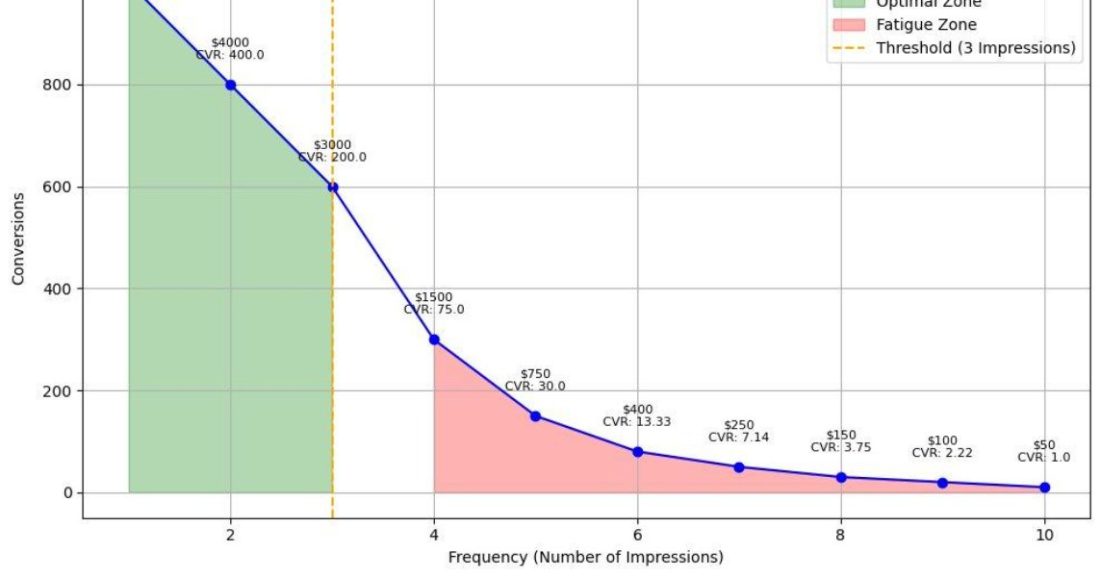
Preventing Ad Fatigue and Wasted Spend
You could run DSP without ever touching a cap. Plenty of advertisers do, and their reports usually tell a sad story of bloated impression counts and thin returns.
You can set frequency caps directly in Amazon DSP at the order or line-item level. At the order level, open the order settings and scroll to the Optimization section. For a specific line item, open its settings and go to the Delivery section. From there, you choose the maximum number of impressions a shopper can receive and the time window for that limit.
But what should that number actually be?
There is no universal cap, but the easiest way to think about it is this: too little frequency means the shopper barely has a chance to remember you, while too much means you are paying for repeat exposure after interest has already stopped growing.
As a starting point, one or two impressions across a long period may be too light to build meaningful recall. At the other extreme, repeatedly serving the same shopper an ad every day, especially after they have already seen it several times without engaging, is a warning sign that frequency may be too high.
The right number depends on intent. A cold prospect usually needs a lighter cap because your goal is to reach more new shoppers. A product viewer or cart abandoner can justify more frequent reminders because they have already shown interest. So the real question is not simply “How many impressions are too many?” It is “At what exposure level do additional impressions stop improving engagement or conversions for this audience?”
Your frequency report gives you that answer. If conversion rate or detail page view rate rises through the first few exposures and then flattens, the plateau is your signal. Impressions served beyond that point are increasingly likely to be wasted. Later in this guide, we’ll show you how to find that plateau and turn it into an actual cap.
How Ad Frequency Impacts ROAS and Brand Perception
Return on ad spend and frequency are tightly linked. Early impressions do the heavy lifting for conversion. By the time a shopper has seen your ad many times without buying, each additional impression drags your ROAS down rather than lifting it.
There is a brand cost too, and it does not show up neatly in a dashboard. Over-exposed shoppers do not just ignore you, they start to resent you. That erosion of goodwill is hard to win back. Thoughtful Amazon DSP Frequency Capping keeps your brand feeling present and relevant instead of intrusive.
The Cost of Over-Exposing Your Audience
Over-exposure costs you three ways at once. You pay for impressions that do not convert. You fatigue an audience you might have converted later. And you miss the reach you could have bought with that same money.
When you add those up, the price of skipping frequency control is far higher than most advertisers realize.
The Three Levels of Frequency Control in Amazon DSP
One of the things that makes Amazon DSP Frequency Capping powerful is that you can control exposure at three distinct levels. Each serves a different purpose, and using them together gives you precise control over total exposure.
For example, you could cap a retargeting line item at 5 impressions per week, set an overall order cap of 10 impressions per week, and use a Frequency Group to make sure the same shopper does not exceed 15 impressions across several overlapping orders.
Amazon DSP Order Level Frequency Cap
The order sits at the top of your campaign structure, so the Amazon DSP order-level frequency cap acts as your master ceiling. Whatever you set here governs total exposure across every line item inside that order. If you want a shopper to see your brand no more than a set number of times per day regardless of which line item serves the ad, this is where you set it.
For example, say one order contains three line items: one for in-market audiences, one for product viewers, and one for cart abandoners. You set an order-level cap of 10 impressions per shopper per week. A shopper might see three ads from the in-market line item, four from the product-viewer line item, and three from the cart-abandoner line item. Once their total exposure across all three reaches 10, the order-level cap stops serving them more ads from that order until the window resets.
Most advertisers start here. A sensible Amazon DSP order-level frequency cap creates a safety net so that even if individual line items get aggressive, the overall exposure stays within reason. Think of it as the outer boundary that everything else has to live inside.
Amazon DSP Line Item Frequency Cap
Line items live inside the order, and each one usually targets a specific audience or placement type. The Amazon DSP line item frequency cap lets you tune exposure for that specific slice. A retargeting line item with warm, high-intent shoppers can carry a higher cap, while a prospecting line item aimed at cold audiences deserves a lighter touch.
This is where strategy gets interesting. The Amazon DSP line item frequency cap always operates within the order ceiling, so the two work as a nested pair. Your order sets the outer limit, and each line item fine-tunes exposure underneath it based on how much that particular audience can absorb.
Frequency Groups: Capping Across Multiple Orders
Here is the gap that used to trip everyone up. Order and line item caps only control exposure within a single order. If you run three orders that target overlapping audiences, a shopper could hit the cap on each one separately and still get flooded overall.
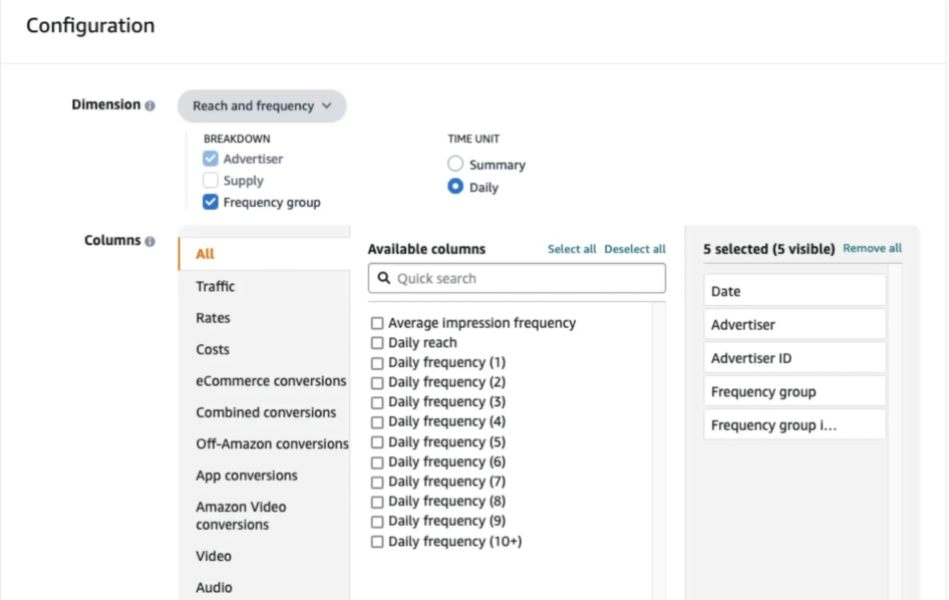
Frequency Groups solved this. Launched by Amazon in late 2023, this feature lets you apply a single unified cap across multiple orders at once. One large consumer goods advertiser discovered a 34 percent reach overlap across orders from three brands under the same business line, which is exactly the kind of hidden over-exposure Frequency Groups are designed to catch. If you run more than a couple of orders against similar audiences, Frequency Groups belong in your setup.
Order vs. Line Item vs. Frequency Groups
| Control Level | LevelScope | Best Used For | Sits Within |
| Order Level Cap | All line items in one order | Setting your master exposure ceiling | The order |
| Line Item Cap | One audience or placement | Tuning exposure per audience type | The order cap |
| Frequency Groups | Multiple orders at once | Preventing cross-order over-exposure | Your account strategy |
Read the table as a hierarchy. The order cap is your outer wall, the line item cap is your interior tuning, and Frequency Groups stitch multiple orders together so nobody slips through the cracks.
How Frequency Capping in Amazon DSP Works
Every frequency cap has two parts: the number of impressions allowed and the time window for that limit. A cap of seven impressions per day creates a very different level of exposure from seven impressions per week.
Once a shopper reaches the limit, Amazon DSP stops serving them additional ads covered by that cap until they become eligible again.
How Time Windows Change Ad Exposure
The time window determines how quickly a shopper can see your ads again.
For example:
3 impressions every 24 hours allows up to three ad views in that period.
5 impressions every 7 days spreads exposure across a week.
10 impressions every 30 days controls cumulative exposure over a longer period.
The number alone does not tell you whether a cap is high or low. Seven impressions per day could become heavy exposure, while seven impressions per month may be too light for some campaigns.
What Happens When a Shopper Reaches the Cap?
Say you set a cap of 3 impressions every 7 days. A shopper sees your ad three times and reaches the limit. Amazon DSP then stops serving them additional ads covered by that cap until they become eligible again.
The cap controls how much exposure is allowed, not when each impression appears. Three impressions per week does not mean Amazon will neatly space them across Monday, Wednesday, and Friday. Delivery still depends on auction opportunities and campaign pacing.
Daily vs. Weekly vs. Longer Windows
Shorter windows allow more concentrated exposure. They can make sense for launches, promotions, and high-intent retargeting where shoppers have a limited time to act.
Longer windows are usually better suited to awareness and prospecting campaigns. For example, five impressions across seven days keeps the brand visible without making the shopper eligible for several ads every day.
The longer the campaign runs, the more important total exposure becomes. A daily cap may look reasonable on its own but still add up to dozens of impressions over a month.
How Lifetime Frequency Caps Work
A lifetime cap controls how many times a shopper can see your ads across the entire campaign flight.
For example, say you run a 90-day campaign and want to stop serving ads after a shopper reaches 20 total impressions. Standard recurring caps cannot fully solve this because the shopper becomes eligible again as each time window resets.
Instead, you can use Amazon Marketing Cloud to identify shoppers who cross the cumulative impression threshold, create an audience from them, and push that audience back into DSP as an exclusion.
20 total impressions reached → shopper enters the AMC audience → audience is excluded from further DSP delivery.
This is especially useful for long-running campaigns where reasonable daily or weekly caps can still add up to excessive exposure over time.
Which Time Window Should You Choose?
Choose the window based on campaign intent. Prospecting usually needs lighter exposure to preserve reach. Retargeting can support more frequent reminders because the shopper has already shown interest. Short promotions may also justify higher frequency because the conversion window is limited.
The real question is not simply “Is my cap too high?” It is, How quickly can this shopper become eligible again, and how much total exposure could that create over the full campaign?
How the Frequency Cap of Amazon DSP Ads Applies Across Devices
Amazon has a real advantage here that most platforms cannot match. Because shoppers are usually signed in to their Amazon account across phone, laptop, tablet, and connected TV, the frequency cap of Amazon DSP ads follows the person rather than the device.
That means a shopper who sees your ad on their phone and later on their TV counts as the same individual against your cap.
This person-level accuracy is a quiet superpower of Amazon DSP Frequency Capping. It is also why Amazon DSP reach and frequency numbers tend to be more trustworthy than the device-fragmented counts you get elsewhere.
How Caps Interact With Bidding and Pacing
Caps do not operate in a vacuum. When you tighten a cap, you shrink the pool of shoppers the platform can serve, which can affect how quickly your budget spends.
Set the Amazon DSP frequency cap too low with an aggressive pacing setting, and you may struggle to deliver your full budget.
The practical guidance is to move both levers together. If you lower your caps, watch your pacing and delivery to make sure the campaign can still hit its budget. If delivery slips, you either loosen the cap slightly or widen your audience. Good Amazon DSP Frequency Capping is a balancing act between exposure control and delivery, not a set-and-forget switch.
There’s a timing dimension worth layering onto this too. SellerApp‘s 2026 benchmark data shows ACoS swings about 4.5 points seasonally, roughly 28% in October (the cheapest month to advertise) versus 32.5% in January (the most expensive).
If you tighten caps hard during the expensive January window, watch delivery closely; if you loosen them slightly in the cheaper October trough, you can often buy more efficient reach for the same budget. Flat, set-and-forget caps miss that arbitrage entirely.
Amazon DSP Frequency Cap Settings: How to Set Them Up
Now to the hands-on part. The Amazon DSP frequency cap settings live in a couple of predictable places, and once you know the path, it takes seconds.
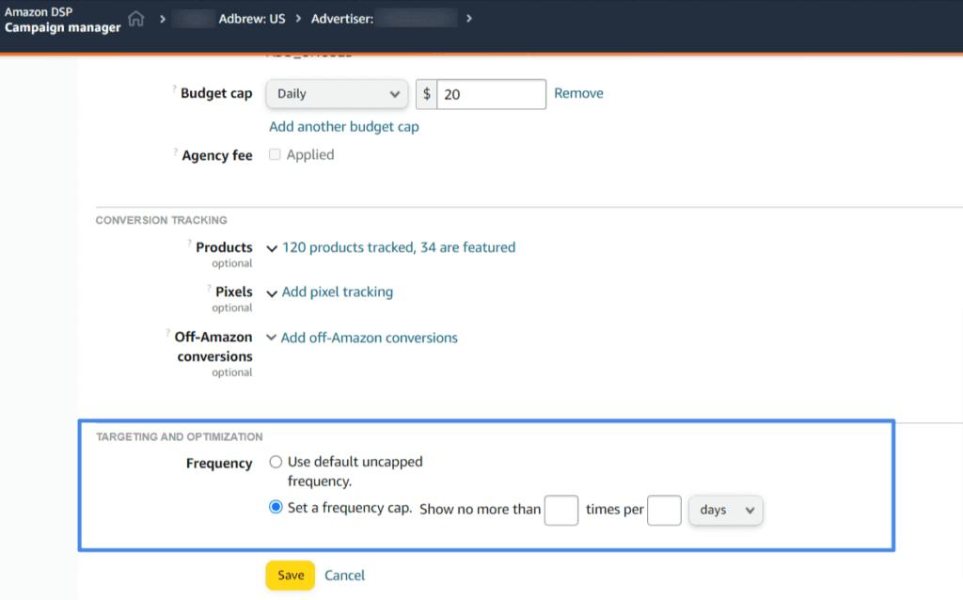
Step-by-Step Guide to Frequency Cap Settings
For the order level, follow this path.
- Open Amazon DSP and go to Campaign Manager.
- Create a new order or open the settings of an existing one.
- Scroll to the optimization section near the bottom of the order settings. (Screenshot: Order settings, optimization section.)
- Enter how many times you want your ad shown and over what window, for example, five times per day.
For the line item level, the flow is almost identical.
- Open or create a line item inside your order.
- Scroll to the Delivery section. (Screenshot: Line item Delivery section.)
- Enter the cap number and time window for that specific line item.
Those are the core Amazon DSP frequency cap settings for a single order. For Frequency Groups, you build the group first, apply your unified cap to it, and then assign the relevant orders.
Choosing Between Order-Level and Line-Item Caps
The honest answer is you usually want both. Set the Amazon DSP order-level frequency cap as your overall ceiling, then use line item caps to tune specific audiences underneath it. A common best-practice starting point is a cap of around seven per day at the order level, adjusted up or down once you see performance data.
Let your category economics inform that first number. SellerApp’s 2026 benchmarks show CPM now averages $7.82 per thousand impressions after a 47.46% jump in 2025, so the cost of over-serving is higher than most flat-budget plans assume.
In premium-CPM categories like Pets ($11.66) and Health ($11.13), a tighter opening cap protects margin, while cheaper-reach categories like Toys & Games ($4.30) give you more headroom before waste sets in.
If you only have time for one, start with the order cap. It is your fastest protection against runaway exposure. Then layer in the Amazon DSP line item frequency cap for each audience as you learn which convert on fewer impressions and which need more nurturing.
Setting Frequency Caps by Funnel Stage
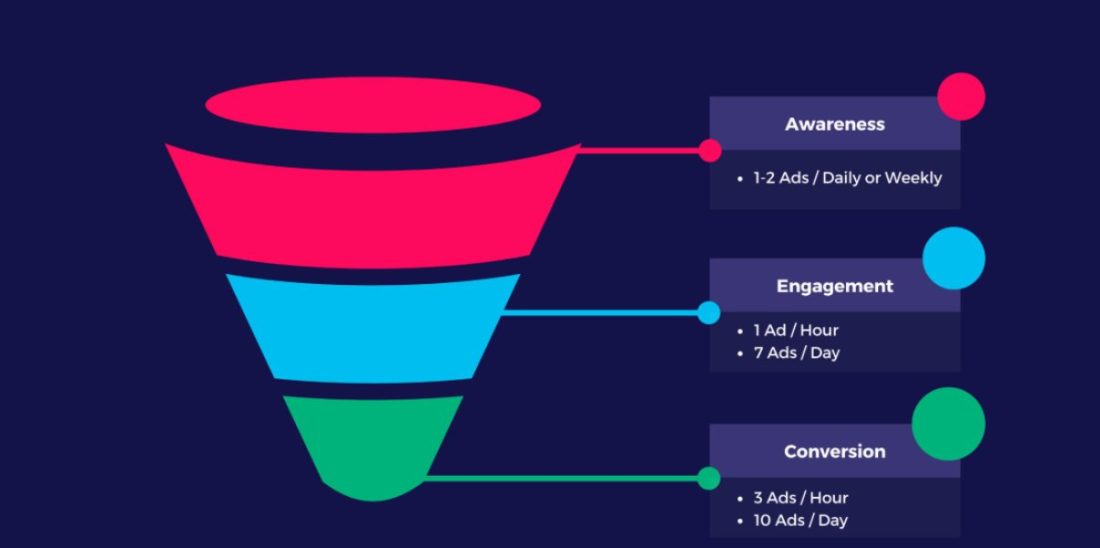
Not every shopper needs the same exposure, and this is where the Amazon DSP line item frequency cap really earns its keep. A new-to-brand prospect and a cart abandoner are in completely different mindsets, so treating them identically wastes money on one and under-serves the other.
For upper-funnel prospecting, keep frequency light so you can spread reach across more new shoppers, and this is where DSP does its heaviest lifting, since SellerApp reports 36.5% of DSP-attributed purchases come from customers who have never bought the brand before.
For mid-funnel consideration, a moderate cap keeps you present without becoming noise. For lower-funnel retargeting, a higher cap is often justified because these shoppers already have intent and sometimes just need one more reminder.
Adjusting the Amazon DSP frequency cap settings per line item is how you honor that difference. Matching your caps to funnel stage is one of the highest-leverage moves in all of Amazon DSP Frequency Capping.
Amazon DSP Reach and Frequency: Finding the Right Balance
Setting caps is easy. Setting the right caps is the craft. This is where you shift from mechanics to judgment.
Recommended Frequency Benchmarks by Campaign Goal
Benchmarks give your Amazon DSP Frequency Capping a sane starting point. They are starting points, not gospel, but they save you from guessing blind, and they matter more now than they used to.
SellerApp’s 2026 benchmark data shows platform-wide CPM jumped 47.46% in 2025 to an average of $7.82 per thousand impressions, the steepest year-over-year cost increase of any metric on any major digital channel.
When reach gets that much more expensive, every wasted impression above your sweet spot costs measurably more than it did a year ago, which is exactly why a deliberate cap has moved from nice-to-have to essential.
For broad awareness and prospecting, keep frequency light so you spread reach across more new shoppers. This is where DSP earns its place: SellerApp found that 36.5% of DSP-attributed purchases come from customers who have never bought from the brand before, so a lighter cap protects your ability to keep finding those first-time buyers instead of re-serving the same faces.
For consideration campaigns, a moderate exposure level keeps you memorable without tipping into fatigue. For conversion and retargeting, you can afford heavier frequency because intent is already there and the audience is warm.
Cost context should also shape the ceiling you pick. High-CPM categories punish over-exposure hardest. In SellerApp’s data, Pets runs about $11.66 CPM and Health about $11.13, so a loose cap in those categories burns budget fast, while low-CPM categories like Toys & Games at roughly $4.30 give you more room before waste sets in.
Video is the one place a higher cap is often justified, since DSP 15-second video completion rates sit in the 65–75% range, meaning shoppers are actually finishing the message rather than tuning it out.
Treat all of this as your first draft. Your own data on Amazon DSP reach and frequency will tell you where your real sweet spot lives, and it will differ by product, season, and audience.
The Conversion Sweet Spot (What the Impression Data Shows)
When you look at conversion data broken out by exposure level, a pattern almost always appears. Purchase rates climb across the first several impressions, plateau, and then flatten entirely. Beyond that plateau, you are spending without gaining. That plateau is your conversion sweet spot, and it is exactly what your Amazon DSP frequency cap should protect.
Where that plateau sits depends heavily on your category, and SellerApp’s benchmark data makes the spread obvious. Grocery converts at 15.57% on a $0.58 CPC, so it reaches efficiency fast and rarely needs heavy repetition. Electronics, at a 4.60% conversion rate, is the opposite story: it grinds toward conversion and is only viable because its $104 average order value holds ROAS at 4.15x despite a ~$25 CPA.
A cap that fits Grocery would starve Electronics, and one built for Electronics would flood Grocery long past its plateau. That is why a single flat cap across categories almost always misfires.
The only way to find your own plateau precisely is to look at your own numbers, which brings us to reporting. But the general shape holds across most accounts, and once you have seen it in your data, you will never set a cap by gut feel again.
Aligning Ad Frequency With the Customer Journey
Amazon DSP ad frequency should mirror the journey your shopper is actually on. Early on, they need enough exposure to register your brand. In the middle, they need consistent but not overwhelming reminders. Near the decision, a well-timed nudge can close the deal.
When your Amazon DSP ad frequency ignores that journey and applies one flat number to everyone, you inevitably over-serve some shoppers and under-serve others. Aligning frequency to journey stage is what separates campaigns that feel helpful from campaigns that feel like harassment.
Balancing Reach and Frequency for Maximum Efficiency
Efficiency in DSP is largely a reach-versus-frequency decision. Every impression you pour into an already-saturated shopper is an impression you did not spend reaching someone new. The art is to serve each shopper enough to convert and not one impression more, then send the leftover budget out to find fresh reach.
Using the Amazon DSP Frequency Report to Optimize Campaigns
You cannot optimize what you cannot see. The Amazon DSP Frequency Report turns your exposure data into decisions, and learning to read it is one of the most valuable skills in the whole discipline.
How to Generate the Frequency Report in Amazon Marketing Cloud
The richest exposure data comes from Amazon Marketing Cloud. AMC ships with an Instructional Query called DSP Impression Frequency and Conversions, which is your starting point for a true frequency report. You plug in your campaign ID, run the query, and AMC returns a breakdown of shoppers grouped by how many times they were exposed.
You can also pull deduplicated reach and frequency through the Reach and Frequency report, including cross-order metrics when you use Frequency Groups. Between the AMC query and the standard report, you get both the granular exposure curve and the clean account-level view. Together they form the backbone of any serious frequency report workflow.
How to Read the Amazon DSP Frequency Report (Step by Step)
The goal is simple: find the point where more ad exposure stops improving performance. The report shows how conversion and engagement change as shoppers move from one impression to two, three, four, and beyond, helping you identify where your frequency cap should sit.
Step 1: Look at the frequency buckets
Start with the exposure groups. These show how many shoppers saw your ad once, twice, three times, and so on, usually up to 10 or more impressions.
Step 2: Compare performance across each bucket
Look at the purchase rate, conversion rate, and detail page view rate for each exposure level. The goal is to see whether performance improves as shoppers see your ads more often.
Step 3: Find where performance starts to flatten
Follow the metrics as frequency increases. If conversions rise from one to five impressions but barely improve after the sixth, you have found your plateau.
Step 4: Set your cap near the plateau
Use that point to guide your frequency cap. If additional impressions are no longer improving conversions or engagement, continuing to serve them is likely adding cost without adding meaningful value.
Key Metrics to Track (Reach, Frequency, ROAS, DPVR)
Four metrics carry most of the weight. Reach tells you how many unique shoppers you touched. Frequency tells you how often. ROAS tells you whether the exposure paid off. And detail page view rate, or DPVR, tells you whether shoppers were curious enough to click through and learn more.
Watch these together rather than in isolation. Rising frequency with flat DPVR and falling ROAS is the classic fingerprint of over-exposure. When you see that combination in your Amazon DSP frequency report, your caps are almost certainly too loose.
Turning Report Insights Into Cap Adjustments
Insight only matters if it changes what you do. If your data shows conversions plateauing at four impressions, there is little reason to let shoppers see you eight times, so bring the Amazon DSP frequency cap down toward that plateau. If you notice you are barely reaching your daily cap and still converting, you may have room to expand reach instead.
Make one change at a time and give it enough runway to show a clean result. Rushed, simultaneous changes make it impossible to know what actually worked. Patient, evidence-based adjustment is the heart of good Amazon DSP Frequency Capping.
A/B Testing Different Frequency Caps
The most rigorous way to find your ideal cap is to test it. Run two comparable line items or orders with different caps and hold everything else steady. Let them gather enough data to be meaningful, then compare ROAS, reach, and conversion rate.
Small, controlled tests beat big assumptions every time. Over a few cycles of testing, you will converge on caps that are genuinely tuned to your products and audiences rather than borrowed from a generic benchmark.
Managing Frequency at Scale with SellerApp’s DSP Dashboard
Everything above is manageable when you run one or two orders. The trouble starts when you scale.
The Problem With Managing Frequency Manually Across Orders
Once you have a dozen orders, a stack of line items, and overlapping audiences, tracking exposure by hand becomes a nightmare. You are jumping between order settings, line item settings, Frequency Groups, and AMC queries, trying to hold the whole picture in your head. Something always slips. A shopper gets over-served, a cap gets forgotten, budget leaks for weeks before anyone notices.
This is precisely the point where manual Amazon DSP Frequency Capping stops scaling and starts costing you. The mechanics have not changed, but the sheer number of moving parts has outgrown a spreadsheet.
A Unified View of DSP and Sponsored Ads Performance
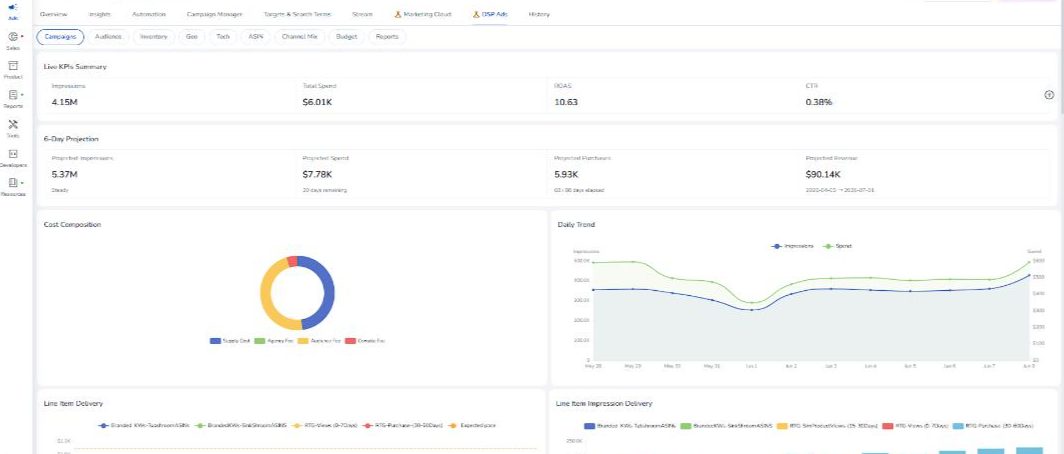
This is where SellerApp changes the equation. Instead of stitching together exports and console tabs, SellerApp gives you one dashboard that brings your DSP and Sponsored Ads performance into a single view. You see reach, frequency, and profitability side by side, across orders, without hopping between screens.
That unified view matters because DSP does not run in isolation. Your Amazon Sponsored Products and Sponsored Brands campaigns are hitting many of the same shoppers, and only a combined view shows you the true exposure picture. SellerApp gives you that whole-account clarity so your frequency decisions account for everything a shopper actually sees.
Connecting Frequency Data to Profitability, Not Just Impressions
Most native reporting stops at impressions and reach. SellerApp pushes further by tying your frequency data to real profitability. It is one thing to know a shopper saw you six times. It is far more useful to know what those six impressions cost you and what they returned.
By connecting Amazon DSP ad frequency to margin and net profit, SellerApp helps you set caps around what actually makes money rather than what merely looks busy. That shift from impression-counting to profit-thinking is where the platform earns its place in your stack.
Automating Cap Adjustments and Cross-Campaign Overlap
The biggest time-saver is automation. SellerApp surfaces cross-campaign overlap so you can spot the shoppers being hit from multiple angles, and it helps you adjust caps without manually crawling through every order.
Instead of reacting weeks later when the damage is done, you get ahead of over-exposure while it is still cheap to fix.
For any advertiser running frequency capping Amazon DSP campaigns at real scale, that combination of overlap visibility and guided adjustment is the difference between managing your program and being managed by it.
SellerApp turns Amazon DSP Frequency Capping from a manual chore into a controlled, profit-aware system.
Common Amazon DSP Frequency Capping Mistakes to Avoid
A few mistakes show up over and over, and even experienced teams trip on Amazon DSP Frequency Capping. Every one of them is avoidable.
- Setting no cap at all and letting the auction decide, which almost always drifts toward over-exposure.
- Applying one flat cap to every audience regardless of funnel stage, which wastes spend on warm shoppers and starves cold ones.
- Forgetting Frequency Groups when you run overlapping orders, so shoppers get flooded across orders even though each frequency cap Amazon DSP shows looks reasonable.
- Ignoring the frequency cap of Amazon DSP ads across devices and assuming device-level counts tell the full story, when Amazon’s person-level view is what actually matters.
- Setting caps once and never revisiting them, even as products, seasons, and audiences shift.
- Tightening caps so aggressively that delivery collapses and you cannot spend your budget. Avoiding these six covers most of what goes wrong with frequency capping Amazon DSP accounts in the wild.
Amazon DSP Frequency Capping Best Practices Checklist
Keep this list somewhere you will actually see it.
- Set an Amazon DSP order-level frequency cap first as your master ceiling, then tune the Amazon DSP line-item frequency cap for each audience underneath it.
- Start near seven impressions per day at the order level, then adjust from your own data.
- Match caps to funnel stage, lighter for prospecting and heavier for retargeting.
- Use Frequency Groups whenever you run overlapping orders.
- Build lifetime caps through AMC custom audiences for long flights.
- Pull the Amazon DSP frequency report regularly and find your conversion plateau.
- Track reach, frequency, ROAS, and DPVR together, never in isolation.
- Change one variable at a time and give it room to prove itself.
- Watch pacing and delivery whenever you tighten a cap.
- Remember the frequency cap of Amazon DSP ads follows the shopper across devices, so trust the person-level view.
- Bring DSP and Sponsored Ads into one view so your frequency cap Amazon DSP decisions account for total exposure.
Run through this checklist every time you build or audit a campaign, and you will sidestep the vast majority of frequency problems before they cost you anything.
Final Takeaway: Mastering Frequency Capping in Amazon DSP
If there’s one idea to carry out of this guide, it’s that frequency capping rewards attention. The advertisers who win with it aren’t the ones with the fanciest setup. They’re the ones who keep looking. They watch where conversions plateau, they notice when a warm audience needs a heavier hand and a cold one needs a lighter touch, and they adjust before waste turns into a habit.
None of it is complicated on its own. A sensible order cap gives you a safety net. Line item caps let you match exposure to intent. Frequency Groups close the cross-order gaps that quietly flood shoppers. And your reports tell you, in your own numbers, exactly where the sweet spot sits. Do those four things with a little discipline and you’re already ahead of most accounts running today.
What changes as you scale is not the strategy but the surface area. One or two orders you can hold in your head. A dozen orders with overlapping audiences you cannot, and that’s the moment frequency stops being a setting you tune and starts being a system you manage. Getting there is a good problem to have, because it means the program is working.
So treat the cap as what it really is. Not a box to tick, but one of the few levers that decides whether your spend builds a business or just buys impressions. Get it right and it pays you back every single day.
That’s the real prize here. Dial in your frequency and you stop paying to re-reach people who already converted, and start turning fresh eyes into new-to-brand buyers, the shoppers who become your next repeat customers. If you’d rather have that handled end-to-end, SellerApp is the DSP Agency That Turns Browsers Into NTB Buyers, making genuinely new sales repeatable at scale so every impression pushes toward a first purchase instead of a wasted one.
FAQ
1. How many impressions per day should I set as a frequency cap on Amazon DSP?
There’s no universal number, but most practitioners start between 5 to 8 impressions per day, then adjust from performance. Multiple agencies converge on this range. Seven per day at the order level is a widely recommended default, while some set retargeting caps at 6 per day, raising to 8 during a launch to build momentum, then lowering once it gains traction. Every week, 5 to 10 impressions per shopper per week is a common starting point. Your product, audience, and funnel stage determine the right number.
2. At what frequency do Amazon DSP conversions stop improving?
Conversions climb early, then plateau. Recent DSP analyses show most conversions happen within the first 10 to 18 impressions, after which conversion rates often plateau or even drop. The exact inflection point varies by category and audience, which is why you should find yours in Amazon Marketing Cloud rather than guessing. In one case, capping a brand at 50 impressions per user per month lifted detail page view rate by 45%, raised new-to-brand purchase rate by 66%, and cut cost per new-to-brand by 23%. Trimming waste above the plateau improves the metrics that matter.
3. Should I set the frequency cap at the order level or the line-item level?
Use both. You should set frequency caps at the order level and the line item level together. The order cap is your master ceiling across every line item inside it, and the line-item cap tunes exposure for one specific audience or placement underneath that ceiling. A practical setup looks like capping the order to, say, 10 showings per week, then limiting a specific audience to 5 showings per day at the line-item level. That nesting lets you protect overall exposure while fine-tuning by audience warmth.
4. Does the Amazon DSP frequency cap count across devices, or per device?
Amazon caps at the person level, not the device, which is a real advantage. Because shoppers stay signed into their Amazon account across phone, laptop, tablet, and connected TV, one individual seeing your ad on multiple screens still counts as one against your cap. This matters because on cookie or device-based platforms, a limit of 3 a day per device can become 9 actual exposures for the same person. Amazon’s account-level identity avoids that fragmentation, making its reach and frequency numbers more trustworthy than device-based counts elsewhere.
5. How do I cap frequency across multiple DSP orders at once?
Use Frequency Groups. This Amazon DSP feature limits how many times a unique user is exposed to ads across multiple orders, unlike order-level caps that apply to only a single order. It closes a gap that floods shoppers. When separate orders target overlapping audiences, a user can hit each order’s cap individually and still be over-served overall. The problem is real. One large consumer packaged goods company saw a 34% reach overlap across orders from three different brands under the same business line. If you run overlapping orders, Frequency Groups belong in your setup.
6. Can I set a lifetime frequency cap on Amazon DSP?
Not directly through the standard settings, but there’s a workaround. To set lifetime caps, first create a custom audience in Amazon Marketing Cloud, then push it to your DSP. You build the audience around cumulative impressions, meaning everyone who has already seen your ad a set number of times over the flight, and apply it as an exclusion so those shoppers stop being served. It’s an extra step the console won’t do on its own, but for long campaigns where total exposure matters more than daily rhythm, it’s the reliable way to cap lifetime frequency.
The post Amazon DSP Frequency Capping: A Complete Guide to Frequency Caps, Settings & Reports appeared first on SellerApp Blog.
from SellerApp Blog https://ift.tt/DLuo4Am
via IFTTT
Add a review